There’s something special about watching a youth soccer team pass the ball around with confidence. Crisp touches. Clean movement. Players in sync, not by accident, but because they’ve trained their feet, their eyes, and their minds to work together.
That kind of rhythm doesn’t happen by chance. It starts with habits, and one of the best habits you can build is a solid passing warm-up drill that gets every player moving, thinking, and connecting.
Be it you’re running practice or preparing your team for a match, this passing warm-up drill sets the right tone.
It’s not complicated. It doesn’t need fancy equipment.
But it works. And more importantly, it teaches something deeper, trust in the teammate next to you, sharp awareness of the field, and the ability to play simple, smart soccer.
Let me walk you through everything. Setup, structure, variations, and even the little coaching tips that make a big difference.
Info
- Age Group: 7+
- Players: 4 or more
- Area: 20×30 yards
- Time: 15 minutes
- Focus: Passing and movement
- Difficulty: Medium
- Goalkeepers: Not required
Why Passing Drills Should Start Your Session

When players step onto the field, their bodies are still shaking off the last bits of the day. Maybe school just ended, or maybe they’re still waking up from a groggy early morning tournament.
Either way, starting with something too aggressive too soon rarely ends well. That’s why passing warm-ups work so well.
They ease players in. The body wakes up, the mind starts clicking, and before long, the ball is doing the work.
It’s not just about warming up physically.
These drills are about decision-making, positioning, and body movement. They simulate the flow of real matches and teach players how to think a step ahead while staying sharp in the moment.
CHECK OUT | How to Run a Perfect 7v7 Soccer Scrimmage for Youth Teams
Drill Setup
You won’t need much; just some cones, a few soccer balls, and players paired off. This is how to get the drill set up properly:
- Players: Minimum of 4 players (2 per group)
- Ball: One ball per pair
- Field Size: Around 20×30 yards, but this is flexible
- Cones: Use standard cones and a few of a different color for variation
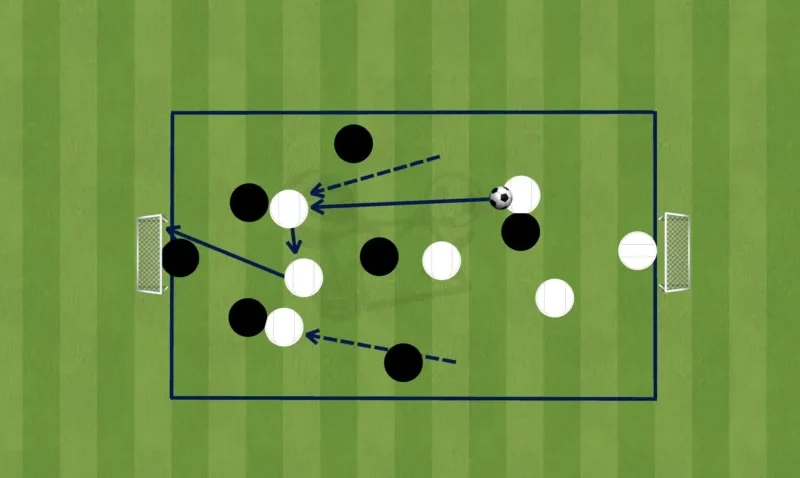
Here’s how to lay out the drill:
- Create a passing lane about 5 yards wide and 10 yards long using cones.
- Set a third cone about 5 yards behind one side of the passing lane to form a triangle.
- Players line up opposite each other, one on each side of the passing lane.
- This triangle becomes the heart of the movement for each passing variation.
This setup gives players space to pass, move, and react without crowding. It also builds spatial awareness and simulates real match movement in small doses.
Drill Instructions
Once the drill is set up and players are in their pairs, walk them through each variation slowly at first. Let them understand the motion before ramping up the intensity.
You’ll want to spend around 3 to 4 minutes per variation, depending on the energy level and age group.
Here are the core passing variations:
1. Basic Two-Touch Passing
This is where it all begins. Players pass with two touches: one to control, one to release. Focus on accuracy and the quality of the touch.
- Players stay on the balls of their feet.
- Eyes on the ball, then up.
- Soft first touch, firm second pass.
Coaching tip: Watch for players standing flat-footed. You want them light, moving, alert.
2. Two-Touch With Lateral Movement Around Cones
Now we add mobility. After each pass, the player jogs around the cone to the right, then back to their starting point. Next pass, they go left. And so on.
- Keeps players light and active.
- Introduces lateral movement and quick changes in direction.
This variation teaches players not to admire their passes. In real games, movement after the pass is often what opens up play.
3. Two-Touch With Chest-to-Ground Recovery
This one adds a bit of fun and fitness. After passing, the player drops quickly to touch their chest to the ground, pops back up, and gets ready to receive again.
- Builds core strength and quick recovery.
- Forces players to stay mentally sharp and react fast.
Great for ages 9 and up. Younger players can substitute a squat instead if it’s too challenging.
4. Two-Touch With Turn Around Cone and Check-In
Now we’re bringing game-like motion into the drill. After each pass, the player turns and runs around the back cone, then checks into the middle to receive again.
- Teaches timing and checking in for the ball.
- Mimics midfielder movement when they pop out of coverage and ask for the ball again.
Make sure players aren’t just jogging through it. Challenge them to sprint the turn and arrive early, ready for the next pass.
5. Two-Touch With Butt-to-Ground Recovery
Similar to the chest-touch variation, but this time the player touches their backside to the ground after the pass, stands up quickly, and receives again.
- Another fitness layer.
- Builds leg strength and coordination.
This version adds variety and laughter, but it’s more than just fun. It’s about staying sharp under physical fatigue.
6. Two-Touch With Backward Movement and Check-In
Now we switch things up again. After passing, the player backpedals to the cone behind them, then checks into the center cone for the next ball.
- Develops awareness and balance.
- Mimics tracking back in a real match, then checking back into space.
Remind players to stay low while backpedaling and to pivot their heads to stay alert to the ball.
7. One-Touch Passing
End the warm-up on a high note. One-touch passing sharpens everything. Players must think faster, move quicker, and communicate better.
- Promotes precision.
- Encourages players to pass and move in rhythm.
- Develops vision under pressure.
This is where the chemistry shows. If players are sharp here, you’ll see the energy lift across the field.
CHECK OUT | Best Places to Play Recreational Soccer Near You
Drill Variations and Add-Ons
Once your players get the hang of the basics, you can sprinkle in a few creative touches to keep it fresh:
- Add a third player to create a passing triangle for rondo-style movement.
- Use weaker feet only for an entire round.
- Set a passing rhythm with a metronome-style callout “pass every 2 seconds.”
- Challenge players with silent passing—no verbal communication allowed.
Keep your eye on the details. Tight touches. Clean body movement. Energy in the passes. That’s where the growth happens.
CHECK OUT | Fun Soccer Drills for 5-Year-Olds: The Ultimate Guide
Coaching Tips for Success
- Keep the tempo up. If it starts dragging, rotate quickly to the next variation.
- Correct bad habits early. Flat feet, poor body shape, slow check-ins, these things grow if not addressed.
- Use positive reinforcement. Point out good habits out loud so others follow.
- Adjust based on age. Younger players need more fun and movement, while older ones can handle more tactical variations.
- Set clear expectations. Every pass should be intentional. Every movement should have purpose.
The Bigger Picture
What this drill builds isn’t just passing technique. It’s connection. It’s movement. It’s game awareness.
Players begin to understand how their body should work off the ball, how to help a teammate by checking into space, and how to pass with both speed and softness.
When these habits are locked in early, they show up again and again during matches. That quick pass under pressure.
That smooth give-and-go. That little movement off the ball that creates a lane. It all ties back to warm-ups like this one.
And for the coach, these drills are your secret weapon. They give you the structure to start every session right. They give players routine, rhythm, and challenge.
CHECK OUT | How to Build Stamina and Endurance: 10 Tips for Soccer Players
Last Word
15 minutes is all you need. Every practice. Every matchday. Just enough time to get the blood flowing, the touches dialed in, and the team connected.
The drill doesn’t need to be loud or flashy.
If you run it with intention, if you push the details and make the little movements matter, you’ll see it show up in the way your team plays.
Calm under pressure. Smart movement. Sharp combinations.